Curtain wall installation is one of the most demanding tasks in commercial construction. Between finding and managing skilled labor, hitting tight tolerances, and keeping workers safe at extreme heights, there’s a lot that can go wrong. This article walks through the traditional curtain wall installation process and shows how robotic automation is helping the façade industry by reducing costs, keeping workers safe, and delivering millimeter-level precision.
What is Unitized Curtain Wall?
Unitized Curtain wall is a high-performance prefabricated exterior building façade that forms the outer envelope of a structure. Panels arrive at the job site fully fabricated and ready to install with no field assembly required. The result is less waste, tighter schedules, and a significantly faster path from groundbreaking to completion.
These systems help regulate temperature, manage air and water infiltration, and maximize natural light. But curtain wall is also a visual statement. It becomes the public face of a company, the architectural identity of a building, and often a defining element of the city skyline.
Unlike traditional load-bearing walls, curtain walls are lightweight systems designed to protect the building from weather while improving energy performance and aesthetics. They help regulate temperature, manage air and water infiltration, and maximize natural light; but their impact goes beyond performance. Curtain wall is also a visual statement. It becomes the public face of a company, the architectural identity of a building, and often a defining element of the city skyline.
Today’s curtain wall systems are used on a wide range of projects (from high-rise towers to large campuses) and frequently incorporate complex architectural features such as curves, angles, integrated lighting, and metal accents.
Traditional Unitized Curtain Wall Installation
Every curtain wall installation follows a similar progression of steps. Each step builds on the step before, which is why precision matters so much from the beginning. Here’s how the process works.
Layout and Anchoring
Precision installation starts with getting the layout right. Crews use surveying equipment to establish control lines, which are precise reference points that show exactly where the curtain wall needs to go on each floor. Once those lines are marked, workers fix mechanical anchors into the concrete slab edge or utilize cast-in concrete embeds to install metal brackets that fasten the panels to the structure.
This is where small mistakes can become big problems. If the layout is off by even a few millimeters on the lower floors, that error compounds as you go up. By the time you’re 20 floors up, what started as a minor alignment issue becomes a major headache.
Bracketing
Brackets are what actually connect the curtain wall framework to the building structure. Workers install these custom brackets at specific load-bearing points, securing the mullions to the structure.
What makes this tricky is that these brackets need to hold everything firmly in place while still allowing for the building’s natural movement. Buildings expand and contract with temperature changes, shift slightly in the wind, and settle over time and the brackets have to accommodate all of that while keeping the facade stable. Making sure the brackets are installed correctly is critical for the long-term performance of the entire curtain wall system.
Set Unitized Curtain Wall Panels
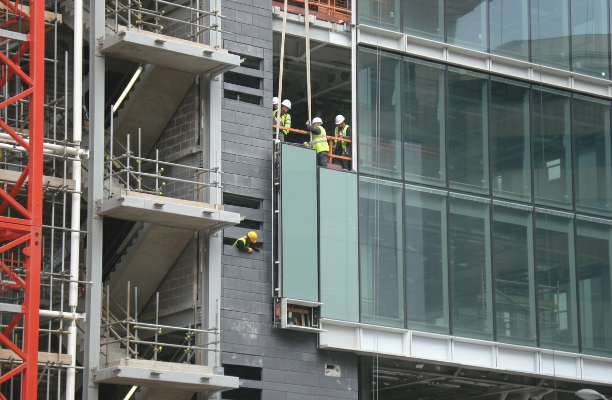
Once embeds are verified and anchors have been installed to the layout markings, installation shifts to setting the unitized curtain wall panels. These panels arrive on site with the glass, aluminum frame, and much of the sealing system already assembled in the factory, allowing installers to place large sections of façade quickly and with consistent quality.
Panels are typically lifted from engineered picking points using a crane, either from the ground outside the building or from within the structure itself. Each unit is hoisted into position and guided toward the slab edge anchors that were previously installed.
At the back of each unitized panel are three-way adjustment screws that connect the panel to the anchors. Installers use these adjustment points to fine-tune the panel’s position in three dimensions: in/out, up/down, and left/right. The exact adjustments required are dictated by the layout markings that were established earlier in the installation process.
Using the layout lines as a reference, installers gradually adjust the screws until the panel aligns precisely with the control lines and adjacent units. This step ensures the façade remains plumb, level, and properly spaced across the entire elevation.
Once the panel is correctly positioned, the connections are secured and the process repeats with the next unit. Through this controlled adjustment process, each panel locks into the larger façade system, forming a continuous and precisely aligned curtain wall.
Sealing and Waterproofing
After unitized panels are installed and aligned, crews complete the sealing system to ensure the curtain wall performs as a fully-sealed and tested building envelope.
Installers place compression gaskets and joint gaskets at panel interfaces, apply silicone weather sealant at vertical and horizontal joints where required, and install flashing elements that direct water away from the interior components of the panel. The facade is then tied into the building’s air and vapor barrier to maintain a continuous environmental seal. Backer rod and perimeter sealant are installed where the façade meets adjacent construction for continuous air and water control layers.These layers work together with the curtain wall’s internal drainage paths to manage water infiltration while still allowing the façade to move with thermal expansion/contraction, wind loads, and interstory drift.
Perimeter Fire Protection and Interior Connections
After the sealing process is complete, installers address interior perimeter conditions where the curtain wall meets the building structure. This typically includes installing fire safing and smoke barriers at the slab edge. Mineral wool insulation and fire containment systems are placed between the curtain wall and the floor slab to help prevent fire from spreading between floors.
A common practice is to place the mineral wool insulation into an aluminum “shadow” box that is installed within the mullions. This serves two purposes: 1) it keeps the insulation securely in place and 2) it creates an aesthetically pleasing uniformity from the exterior of the building, which allows the architect to use a single, floor-to-floor, piece of glass to maintain design intent
Exterior Finishing, Inspection, and Testing
The final stage of installation focuses on finishing details and verifying system performance.
Crews install exterior system components such as pressure plates, snap covers, caps, or trim pieces depending on the curtain wall design. These elements conceal structural fasteners while helping maintain uniform joint spacing and a consistent exterior appearance.
Once installation is complete, the façade undergoes cleaning and quality verification. Protective films are removed from glass and aluminum, sealant joints are inspected for continuity, and installers verify that anchors, brackets, and panel connections remain properly torqued and aligned.
Testing is also an important part of post installation work. Many projects require field water testing to confirm the curtain wall’s resistance to water penetration. This is often performed using controlled spray rack testing based on ASTM E1105 procedures, where sections of the façade are sprayed with pressurized water while inspectors monitor the interior for leaks. Some projects also include air infiltration testing, thermal imaging inspections, or structural verification of anchors and attachments.
These final sealing, inspection, and testing steps ensure the curtain wall functions as intended, managing structural loads, air infiltration, and water penetration while delivering the finished façade appearance of the building.
Challenges with Traditional Unitized Curtain Wall Installation
Even with experienced crews and careful planning, traditional curtain wall installation comes with some serious challenges. Here’s what contractors are dealing with on most projects.

Safety Risks
Working at height with heavy glass panels is inherently dangerous. Workers are hundreds of feet in the air, handling 1,000-pound glass units, dealing with unpredictable wind gusts that can push suspended panels around. The physical strain of maneuvering these materials takes a toll. In addition, falls, dropped materials, and repetitive strain injuries are constant concerns. Curtain wall installation is consistently one of the riskiest jobs in construction.
Labor Scarcity
Finding skilled labor has become a real problem for the entire construction industry. Experienced workers are retiring, and not enough younger people are coming into the trade to replace them. The result? Costs go up, timelines stretch out, and contractors end up competing for the same small pool of qualified crews.
On large projects, this labor shortage can push schedules back by months, which means penalties and ballooning overhead costs.
Human Error
Even the most skilled crews make mistakes, especially during layout and anchoring. A misalignment of just a few millimeters on the lower floors doesn’t sound like much, but it compounds as you move up the building. By the time you’re on floor 20, that small error has become a major out-of-plumb problem. And fixing these issues often means tearing out completed work and starting over.
Fixing these issues means tearing out completed work and starting over, which is expensive, time-consuming, and frustrating for everyone involved.
Schedule Sensitivity
Curtain wall installation depends on a lot of things that are difficult to control. Tower cranes need to be shared with other trades, which creates scheduling conflicts and downtime. Weather shuts down work constantly—too much wind, rain, extreme heat or cold, and you’re done for the day.
These dependencies make it hard to maintain steady progress and keep the job coordinated with other building systems.
How Robotics Brings Automation and Efficiency to Curtain Wall and Façade Installation

Robotic automation tackles the challenges of traditional curtain wall installation head-on. By combining precision sensing, smart mechanization, and digital integration, modern robotic systems are changing how curtain wall projects get done.
Precision Sensing
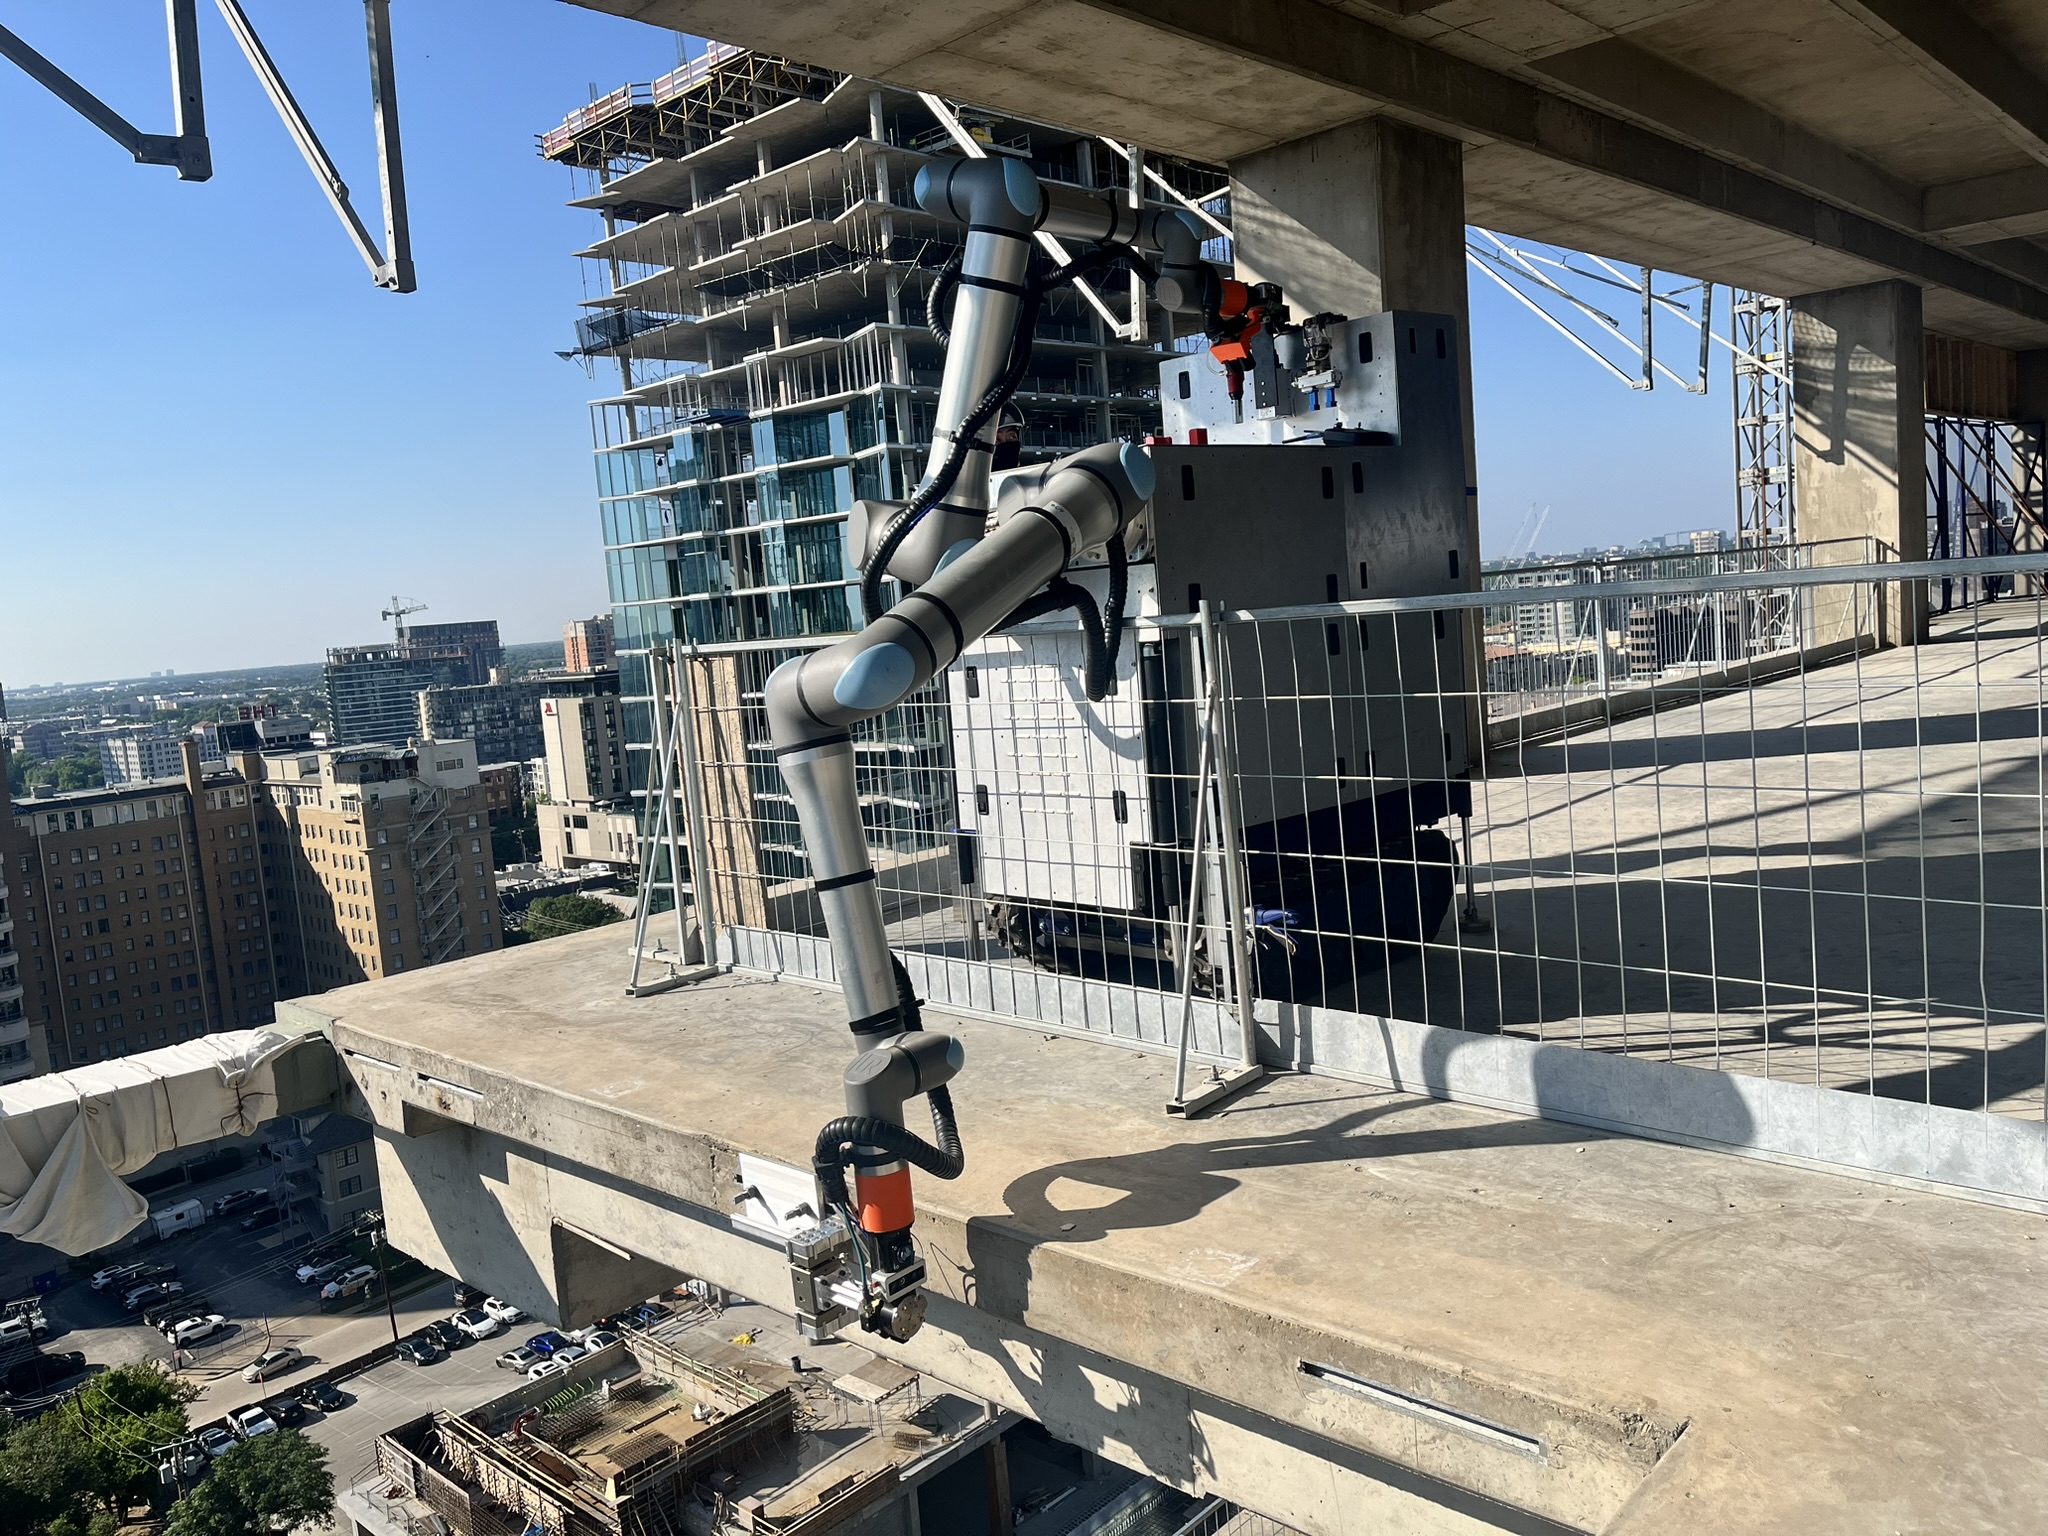
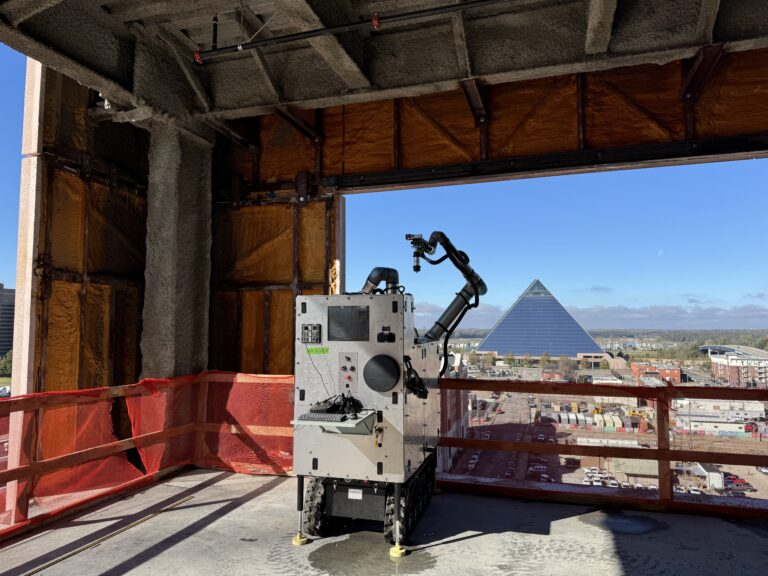
To eliminate the human measurement errors that cause cascading alignment problems, robots localize to robotic total stations directly, enabling all work scopes to be completed with millimeter-level accuracy. Using a combination of vision and haptics, they identify exactly where concrete edges are, detect floor-to-floor height variations, and calculate optimal anchor locations automatically. Any work completed with the localized robot is performed with the same global accuracy, mitigating compounding errors across large floor spans. With robotic automation, every layout mark, bracket, mullion, and subsequent panel gets positioned exactly where it should be according to the BIM or CAD model.
Heavy Lifting
Purpose-built robotic arms and lift-assist devices take the physical burden off workers and aluminum components with consistent precision, no matter the weight or how awkward the dimensions are.
Robots free up skilled workers to focus on supervision, quality control, and tasks that actually need human judgment.
Concurrent Workflows
Unlike human crews, robots don’t need perfect weather or daylight to work. They can operate through night shifts without getting tired, maintain consistent performance in temperature extremes, and keep working in light rain or moderate wind that would shut down traditional crews.
They’re also great in tight interior spaces where manual installation gets awkward. This flexibility speeds up timelines and reduces weather-related delays.
Data Integration
Robotic systems plug directly into the project’s CAD or BIM models. As they install components, drill connections, or complete layout they document the exact as-built location of every element and update the digital model in real time.
The systems also enable project managers to monitor progress remotely, catch potential conflicts before they happen, and maintain comprehensive quality records. This closes the gap between what was planned and what actually got built, which reduces rework and improves coordination with other trades.
Discover How Raise Robotics Can Help on Your Next Project
Raise Robotics is already delivering measurable results on some of the most demanding curtain wall projects in the country. Our robotic systems consistently prove their value in cost savings, schedule acceleration, and worker safety.
Real Results: St. Jude Children’s Research Hospital
When J.R. Butler took on the St. Jude Children’s Research Hospital expansion in Memphis, the stakes were high and the project massive—10,000 curtain wall panels across two 15-story towers. One building was 714,000 square feet, the other 608,000 square feet.
The problem showed up early. Manual layout on the first two floors didn’t meet tolerances, and the rework was painful. “We had to tear out all the panels on the first and second levels, redo the layout, and redo the clips we attach the panels to,” said Morgan Patnode, the project superintendent. That mistake cost between $100,000 and $130,000, plus about six weeks of delays.
They looked at other solutions. Laser-guided installation would have added another five weeks to the schedule. More training for the crew would take time with unpredictable results. Third-party layout contractors were an option, but J.R. Butler ultimately chose Raise Robotics for cost and reliability.
The Raise system changed everything. Using digital plans and autonomous positioning, the robot printed layout marks directly onto concrete with mechanical precision.
The results speak for themselves:
- $100,000 to $130,000 in rework costs avoided on the remaining floors
- Over five weeks of delays prevented
- Consistent 1/16-inch precision throughout
- Zero additional layout defects after bringing in the robot
- Improved worker safety by keeping crews six feet back from leading edges
“When we crunched the numbers, the robot beat our budget. Their price was less expensive than we could do it, and the accuracy eliminated the rework plaguing our manual approach” – Morgan Patnode, Project Superintendent
Read the complete St. Jude Case Study
Start the Conversation
Whether you’re planning a high-rise office tower, a healthcare facility, or a commercial mixed-use development, Raise Robotics can help you overcome the challenges of façade installation.
Contact Raise and let us show you how we can deliver measurable ROI on your next project.